Move a face from one photo into another, the right way
You have two photos. One has the face you want, the other has the body, background, or moment you want to keep. The fastest path is an AI tool like Pixlr or Pica AI, which finishes in seconds and works well when both photos are front-facing and similarly lit. The cleaner path is Photoshop, which takes about ten minutes but lets you fix lighting and skin tone mismatches that AI can't see. Pick by skill level and how forgiving the photos are, then jump to the matching method below.
Which method should you use?
The decision is less about which tool is better and more about which one matches your photos. AI face swap tools map facial landmarks automatically and blend the result in seconds. They are excellent on cooperative inputs and frustrating on awkward ones. Photoshop reverses the tradeoff: nothing is automatic, but every pixel is yours to fix.
Reach for Pixlr or Pica AI when both photos are front-facing, the lighting direction is roughly the same in each, and you do not need a publication-grade composite. Reach for Photoshop when the angles differ, the light is coming from different sides, or the skin tones won't match without correction. If you find yourself fighting an AI tool through three or four uploads with bad results, that is a sign to switch methods rather than keep retrying.
| Factor | Pixlr / Pica AI | Photoshop |
|---|---|---|
| Time to result | Seconds | 5 to 15 minutes |
| Skill required | None | Intermediate |
| Handles lighting mismatch | Poorly | Yes, with Match Color |
| Handles angle mismatch | Poorly | Manually correctable |
| Output | PNG download | PSD plus any export |
| Photos leave your device | Yes | No, fully local |
| Best for | Front-facing portraits, casual use | Mixed lighting, precision work, real people |
Before you start: photo requirements that decide your result
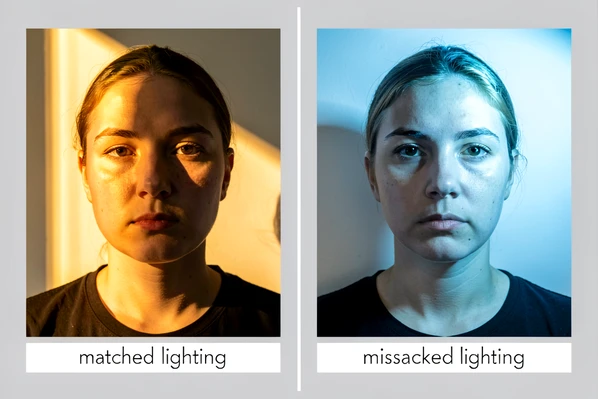
Most bad face swaps are bad photos, not bad tools. The single biggest factor in realism is whether the source and target share the same lighting direction and color temperature. A face lit from the left, dropped into a body lit from the right, will look pasted on no matter how clean the selection is. AI face swap tools have no concept of light direction, so they can't fix this for you. Photoshop can, but only after the fact and only partially.
Before opening any tool, check three things. The source face should be front-facing, well lit, and at a similar angle to the face it is replacing. Profile shots, deep shadows, sunglasses, and extreme tilts all reduce AI detection accuracy and make manual masking miserable. If you are using the Photoshop method, open both images in Photoshop before you begin. Sounds obvious. It is also the step people skip when they try to drag a layer from a file they haven't loaded yet.
For AI tools specifically, crop the source photo tightly around the face before uploading if detection keeps failing. Removing background clutter measurably improves landmark detection on most face swap engines.
Method 1: Pixlr AI Face Swap (fastest, no account needed)
Pixlr AI Face Swap is a browser tool that produces results in seconds and downloads them as PNG files. No installation. No subscription wall on the basic flow. Pixlr states that "your creative output is entirely yours to own, ensuring your content remains private and secure," so the final image belongs to you on their terms.
- Open pixlr.com/face-swap/ in any browser. You don't need to sign up to start.
- Upload the source photo, the one containing the face you want to transplant. A clear, front-facing image gives the AI the best chance of locking onto the right landmarks.
- Upload the target photo, the one whose face you want to replace, or pick a template from Pixlr's built-in library if you just want to test the tool.
- Click Run Face Swap. The AI maps facial features and blends the new face automatically.
- Click the output to download the PNG.
If the result looks off around the jawline or hair, that's a landmark detection issue, not something you can prompt your way out of. Re-crop the source so the face fills more of the frame, then re-run.
Method 2: Pica AI Face Swap (best when you need up to three faces)
Pica AI is the second AI option worth knowing. The free tier supports swapping up to three faces in a single photo, which matters if your target image has more than one person and you only want to replace one of them. Per Pica AI's stated policy, uploaded photos are deleted within 24 hours of upload. That makes it a noticeably safer pick than tools with no published retention timeline, especially when you're working with photos of real people.
- Click Upload and select the target image, the photo you want the new face placed into. Pica AI also offers templates if you just want to experiment.
- Upload the source face photo. The free tier accepts up to 3 faces per image.
- Click Swap. Photos process in seconds. Pica AI also handles video, but that's a different tutorial.
A practical note on privacy: a 24-hour deletion policy is not the same as never being processed, and you should still avoid uploading anything you wouldn't be comfortable having briefly held by a third-party server. For photos of strangers, get consent first. Tools don't handle the ethics for you.
Method 3: Manual face swap in Photoshop, step by step
This is the long path, and it is worth it whenever the photos don't cooperate with AI. The walkthrough below is the version that actually survives the failure modes most tutorials skip, like the Move tool dragging the wrong thing and Auto Blend refusing to run.
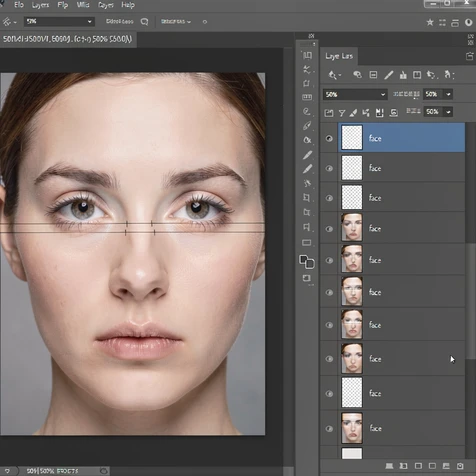
Open both images in Photoshop before you start. They need to live in the same Photoshop session so you can drag a layer between them. Switch to the source photo and press W to activate the Quick Selection tool. Paint over the face area to build a selection. Slightly over-select into the hairline rather than under-selecting; it is easier to erase extra pixels on the mask later than to reclaim missing ones.
Right-click inside the selection and choose Layer via Copy. Rename the new layer "face" so the Layers panel stays readable when things get messy. With the Move tool active and the face layer selected, drag the layer onto the target image's window. If the Move tool drags the entire image instead of just the face, the wrong layer is active. Mechanically, the Move tool transforms whatever pixel layer is currently selected, and if your background layer is highlighted or your face layer is locked, the cursor grabs the wrong thing. Click the face layer in the Layers panel and try again.
Now the most commonly skipped step, and the one that decides whether your composite looks aligned. Lower the face layer opacity to 50%. You should be able to see the target face faintly through the source face. Use Free Transform (Ctrl/Cmd+T) to scale, rotate, and reposition the source face until the eyes and mouth sit directly over the target's eyes and mouth. This technique is documented at kaylabrint.com as the alignment standard for manual face swaps, and skipping it is the single most common reason swaps look misaligned. Return opacity to 100% once the landmarks line up.
Click the layer mask icon at the bottom of the Layers panel. With the mask thumbnail selected, switch to a soft black brush and paint over hair, ears, and neck edges that don't belong. If you go too far, switch the brush color to white and paint back over the over-erased areas. Black hides, white reveals; that is the entire mental model you need for masks.
Now color match. Select the face layer itself, not the mask. Open Image > Adjustments > Match Color. Set Source to the target image and Layer to the background layer. Photoshop will harmonize the skin tone of the transplanted face with the body it now lives on. If the correction looks aggressive and a little plasticky, go to Edit > Fade Match Color and pull the slider back to roughly 60–70%.
Press Ctrl/Cmd+0 to fit the image on screen. Step back from your monitor. Composites look more obviously wrong from a distance than they do at 200% zoom. Refine the mask edges where you spot a seam, then export.
Common mistakes and how to fix them
These are the failure modes that actually show up, not theoretical ones. Most are mechanical: the tool is doing exactly what you told it to, and what you told it to is wrong by one click.
Skipping the 50% opacity alignment
Without seeing through the layer, you cannot align eyes, nose, and mouth precisely. The result looks misaligned even though every other step was clean. Fix: drop opacity to 50%, line up the landmarks, return to 100%. There is no faster shortcut that works.
Different lighting between source and target
Light direction is encoded into the shadows on a face. Drop a face lit from the left into a body lit from the right and the brain reads "fake" instantly, because the highlight on the nose points the wrong way. Fix: pick photos from the same session when you can. When you can't, run Match Color after blending and fade it back if it overcorrects.
Over-erasing the layer mask
Gaps appear in the face. Fix: switch the brush color from black to white and paint back over what you removed. The mask is non-destructive, so the pixels are still there, just hidden.
The Move tool drags the whole image
Wrong layer is active. Click the face layer in the Layers panel, confirm it isn't locked, then drag again.
Auto Blend Layers is greyed out or fills with white
Auto Blend needs both layers to be rasterized pixel layers and both to be selected. Smart Objects are not compatible with the command. Right-click any Smart Object and choose Rasterize Layer, then Shift-click both layers in the Layers panel before re-running. As a refinement, run Edit > Auto-Align Layers > Auto first; it lets Photoshop handle the geometric alignment so Auto Blend has cleaner inputs.
White halo around the transplanted face
This is a fringe problem. Your selection grabbed a one or two pixel ring of the original background, and the mask edge doesn't quite cover it. Contract the selection by 1–2 pixels before creating the mask, or use the Refine Edge brush along the hairline to push the halo into the mask.
Screenshotting the Copy Replace app paywall
Worth flagging because almost no tutorial mentions it. The Copy Replace iOS app costs $4.99 to save a photo and detects screenshots aggressively. Per the App Store listing, the app permanently watermarks every photo loaded into it once a screenshot is detected. Fix: pay the in-app fee or pick a different tool. Trying to outsmart it ruins the install.
Privacy: what each tool does with your photos
If you are swapping faces of real people, this section matters as much as the technical steps. Tools differ wildly in what they say about your uploads, and "private" doesn't mean the same thing across vendors.
- Pica AI: deletes uploaded photos within 24 hours of upload, per its stated policy. The shortest published retention window of the tools listed here.
- Pixlr: states that your creative output is yours and remains private and secure. No explicit deletion timeline is published for the AI Face Swap tool itself.
- Copy Replace (iOS): per its App Store privacy label, the app tracks Device ID, Product Interaction, Advertising Data, Crash Data, and Purchase History. The free tier limits saved faces to 6 and has over 10,000 ratings at 4.5 out of 5, for what that signal is worth.
- Photoshop: fully local. No photos leave your device unless you explicitly upload them somewhere, which is why it stays the right call for sensitive material.
Match the tool to the stakes. Casual swap of your own face onto a meme template? Any tool is fine. Wedding photo where the bride's eyes were closed in the only good shot? Photoshop, on your own machine, end of conversation.