Sharp face swaps: the input, tool, and setting choices that preserve every pixel
A sharp face swap is the product of three decisions. Both images need to be at least 1024x1024 pixels. Lighting and head angle on the source face should roughly match the target. And the tool you pick has to expose the right controls, because some browser apps quietly downsample your output or skip hairline blending by default. Get those right and swaps come out clean. Miss any one and you end up with a soft, haloed, or color-mismatched face that looks pasted onto the rest of the photo.
This guide ranks tools by the quality levers they actually give you, walks the three strongest free and paid workflows step by step, and closes with a symptom-to-fix table so you can recover a bad result instead of burning another credit.
Why face swaps lose detail, and what actually controls output quality
Three mechanical failures account for almost every "why is my result blurry" complaint. None of them are mysteries, and all of them start before the AI even runs.
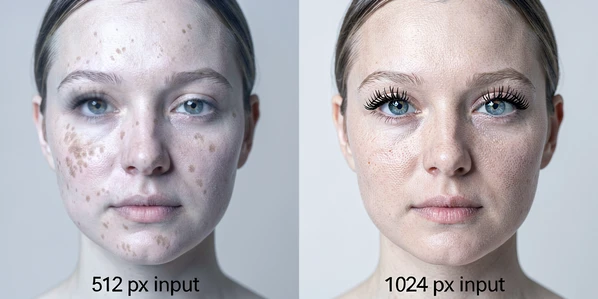
Low input resolution. Face detection models work on a pixel grid. With a tiny input, the detector has too few pixels to locate the eyes, mouth corners, and jawline precisely. The swap still runs, but the reconstructed face inherits the coarseness of the input. PiktID recommends at least 1024x1024 pixels on both source and target for this reason, and it is the single most consequential setting the reader controls.
Facial landmark misalignment. Every face swap tool maps a set of keypoints (eyes, nose, mouth, jaw) from the source onto the target. When the two heads are at very different angles, those keypoints do not line up in 3D space. The warp that tries to bridge the gap stretches the face asymmetrically. Result: a floating, distorted, or subtly "off" look that no amount of post-processing can fully recover.
Alpha-blending artifacts at the edge. The swapped face has to be composited back into the target image. That compositing uses an alpha mask along the perimeter of the face. If the mask is too tight, the hairline shows a visible halo. If the source and target were shot under different lighting, the skin-tone blend leaves a color seam right at the jaw. This is where the flag_hair switch on PiktID and background removal steps in AI Boost actually earn their keep.
Occlusions (hair across the cheek, glasses glare, deep shadows under a brow) break the detector before any of this starts. The tool either fails outright or picks a wrong face boundary, and the output looks wrong in a way that is hard to describe but impossible to miss.
Pre-swap checklist: preparing source and target images for maximum sharpness
Run this check before you upload anything. It takes a minute and prevents most of the problems you would otherwise try to fix after the fact.
- Resolution: both source and target at 1024x1024 pixels or larger. Below this, detection accuracy drops and the output will be soft regardless of tool.
- Source face: clear, front-facing, well-lit, nothing covering the eyes, nose, or mouth.
- Target face: similar angle and lighting to the source. A straight-on source dropped onto a three-quarter target will warp.
- Format: JPG, PNG, or WEBP works across every tool listed here. Facy.ai also accepts BMP and GIF if you have legacy files.
- File size: EaseMate AI caps uploads at 10 MB per image. Most other tools accept larger files but compress aggressively, which costs you detail.
- No glasses glare, no hard shadows crossing the face, no hair draped over the cheek or jawline.
If the source face was shot under different light than the target, do not try to correct that in post. Reshoot the source under matching conditions. Lighting correction after a swap is always less accurate than matching at capture, and it often introduces its own color cast.
Step-by-step: Facy.ai for a free, watermark-free result in under a minute
Facy.ai is the fastest zero-friction path. It is 100% free with unlimited swaps, no watermark, and no sign-up, and it currently holds a 4.6 out of 5 rating from 3,537 user ratings. The trade-off is fewer quality knobs: you get the swap, and the tool picks the settings for you.
- Prepare the source face and target image against the pre-swap checklist above. Accepted formats on Facy.ai: JPG, JPEG, PNG, WEBP, BMP, GIF.
- Open facy.ai/photo-face-swap and upload the photo with the face you want to use as the source.
- Upload the target image where the new face should land.
- Accept the Terms, which confirm you have legal right and explicit permission from everyone depicted, then click Swap Faces.
- Preview the result. If it looks right, download it immediately. Facy.ai automatically deletes uploaded files after 48 hours, and there is no recovery path once that window closes.
Use Facy.ai when you need a quick, clean output and your inputs are already well-prepared. If you need to tune hair blending or prompt strength, skip ahead to PiktID.
Step-by-step: PiktID Swap for production-grade, full-resolution output
PiktID Swap is the tool to use when you need control over how the blend runs. It exposes a hair-blending flag, a prompt-strength slider, and a seed for reproducible results. Sign-up is required and you get 10 free credits to start.
- Confirm both images are at 1024x1024 pixels minimum. PiktID explicitly calls this out as the threshold below which face detection accuracy drops.
- Drag and drop the target image into PiktID Swap. Face detection runs automatically and marks every visible face in the frame.
- Upload your source face. If you want a reusable identity that never exposes a real person's photo, the Anonymize feature creates a stored synthetic face you can reuse across multiple swaps.
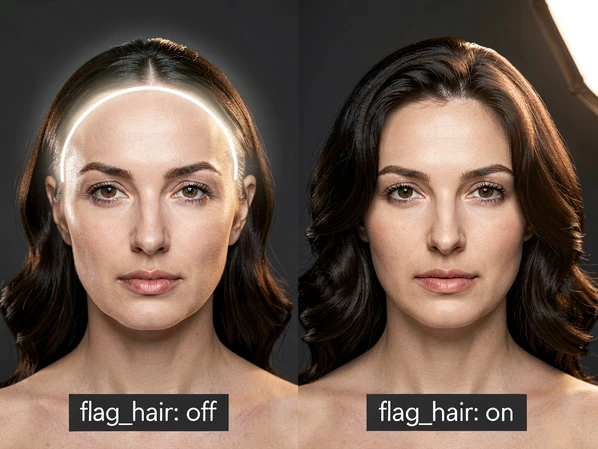
- Set hair=True (the flag_hair option) to extend blending into the hairline. Without it, the edge shows a halo because the blend mask stops at the face perimeter and does not continue into the hair region.
- Adjust prompt_strength. Lower values preserve more of the target image's skin texture and lighting; higher values push harder toward the source face. Set a seed if you want to reproduce or iterate on a specific result.
- Click Generate. Open the History tab to compare outputs side-by-side: run the same swap twice with different seeds and pick the cleaner hairline. Small seed changes often produce noticeably better edge blending without touching any other setting.
- Download the full-resolution output. PiktID stores all generated images for 24 hours, then deletes them. Outputs remain available for 10 minutes after completion when pulled through the API.
Step-by-step: Icons8 Face Swapper with a verified 1024x1024 output cap
Icons8 Face Swapper is worth using when you want a browser-based tool with a known sharpness ceiling. Detected face size is supported up to 1024x1024 pixels, which makes the upper bound of output quality predictable before you start.
- Upload the base photo. High resolution and even lighting matter more here than anywhere else because the detected face size caps the output.
- Pick the face to swap in: upload a source or choose from the built-in gallery.
- Let the AI run. Icons8 handles skin-tone blending and expression preservation automatically without a separate settings pane.
- Download in JPG, PNG, or WEBP. Paid plans add priority processing, email support, and 30-day storage.
Icons8 offers a three-day trial on the annual plan with unlimited face swaps during the trial. The monthly plans do not include that trial, so if you only want to test the tool, pick the annual option first.
Skin-beautifier trick: upload the same photo twice, once as source and once as target. Icons8 runs AI skin enhancement without actually changing identity. It is a cheap way to clean up a portrait before using that face as a source in a later swap.
Quality settings that matter: hair blending, prompt strength, and post-swap enhancement
A few settings have outsize impact on sharpness. These are the ones to actually pay attention to.
Hair blending (flag_hair)
On PiktID, flag_hair extends the alpha blend from the face perimeter into the hair region. Off, the blend stops at the jaw and hairline, and the composite shows a thin bright seam where the swapped face meets the scalp. Leave it on by default. The only reason to disable it is if the target image has unusually complex hair that the blend visibly mangles, and that is rare.
Prompt strength
Prompt strength controls how aggressively the AI replaces target features with source features. Lower values keep more of the target's original skin micro-texture and lighting cues, which usually looks more natural. Higher values lock the source identity in harder at the cost of a slightly pasted-on feel. Start in the middle, nudge lower if the output looks synthetic, nudge higher if the identity is not reading through.
Background removal before the swap
AI Boost recommends isolating the subject before applying the swap. Removing the background cuts the number of pixels the blender has to reconcile at the edge, which reduces compositing errors around the ears, neck, and shoulder line.
Post-swap brightness, contrast, saturation
Once the face is swapped and downloaded, fine-tune brightness, contrast, and saturation to match the swapped face to the rest of the image. Even a technically clean swap looks artificial if the face sits at a different exposure than the body and background. Follow with an AI enhancement pass to recover any micro-texture softened during the swap. This post layer is what separates a publish-ready output from one that reads as AI at a glance.
If the output still looks soft after all of this, the tool's own resolution cap is probably the bottleneck, not your input. Run the result through an AI upscaler after download. The swap itself may be clean; the pipeline just cannot hold more pixels than it was built for.
Troubleshooting: symptom-to-fix guide for common quality failures
Use this table to map a visible failure to the underlying mechanical cause and the fastest fix. Most reader-reported problems sit in one of these six rows.
| Symptom | Technical cause | Fix |
|---|---|---|
| Blurry or soft output | Input resolution too low. Face detector has too few pixels to locate landmarks precisely, so reconstruction inherits the coarseness. | Use images of at least 1024x1024 pixels for both source and target. If output is still soft, upscale after download. |
| Color or skin-tone mismatch at the jawline | Lighting mismatch between source and target produces a discontinuity where the alpha blend meets the target skin. | Use consistent lighting between both images, or activate auto-tone correction. Fine-tune brightness and saturation after download. |
| Hairline halo or soft edge | flag_hair disabled. Blend mask stops at the face perimeter and does not extend into the hair region, leaving a visible seam. | Enable flag_hair (hair=True) on PiktID. Re-run the swap. |
| Distorted or misaligned face | Source and target heads are at very different angles. Facial landmarks do not align in 3D, and the warp stretches the face. | Keep head orientation similar between source and target. Both front-facing or both at the same angle. |
| Detection fails, output looks wrong | Face partially occluded by hair, glasses glare, or shadows. Detector picks a wrong boundary or fails outright. | Use a clean, unobstructed photo. Remove glasses, move hair off the cheek, avoid hard overhead light. |
| Poor quality on anime or illustrated targets | Real-photo-optimized models do not map well onto illustrated style. Pixel statistics and facial geometry differ from training data. | Accept lower quality, or pick a stylization-aware tool. Real-photo swap tools are not built for this case. |
One more quiet failure worth calling out: a washed-out skin tone after the swap. Running a brightness, contrast, and saturation tune in AI Boost typically recovers the look inside two minutes. Start with a small saturation lift, add a touch of contrast, and only adjust brightness if the face reads darker or lighter than the neck.
Privacy, consent, and commercial use: what you need to know before you publish
Every tool covered here has a deletion policy and a consent requirement. Both matter if you plan to ship the output.
- Facy.ai deletes uploaded images automatically after 48 hours. No recovery after that window closes.
- PiktID stores all generated images temporarily for 24 hours. Download within that window or lose the file.
- MyShell processes photos instantly in the browser and deletes them after use. It holds a 4.7 out of 5 rating from 1,287 reviews.
- EaseMate AI deletes uploaded files from its server after processing.
- Higgsfield AI includes commercial use rights with all paid Pro plans. The free tier allows 5 face swap generations every 24 hours.
- WaveSpeedAI outputs are watermark-free and production-ready at a price point of roughly one cent per run.
Consent is not optional. Every tool in this guide requires that you have legal right and explicit permission from everyone whose face or likeness you upload or swap. Non-consensual intimate imagery and impersonation for fraud or deception are prohibited across all of them, and the legal consequences of ignoring this include damages, fines, removal orders, and in some jurisdictions imprisonment. If you do not have permission, do not upload the photo.