Full Head Swap Including Hair: Which Tool to Use and Why It's Harder Than Face Swap
The fastest way to swap a full head including hair is to upload both photos to Live3D (live3d.io/ai-head-swap), which is free, requires no signup, and adds no watermark. Before picking a tool, though, it helps to understand what separates a head swap from a face swap — because most failed results come from using the wrong type of tool entirely.
Head Swap vs. Face Swap: Why Hair Makes All the Difference
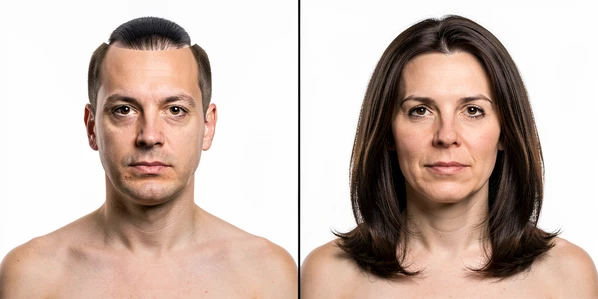
A face-only swap replaces eyes, nose, and mouth. The original hairstyle stays on the body. You end up with person A's features sitting inside person B's haircut, and the hairline mismatch is immediately visible.
A full head swap replaces face, hair, head contour, and neck as a single unit. The transferred head lands with its original hairstyle intact, so the hairline belongs to the same person as the face.
The hairline boundary is the hardest edge for AI to blend cleanly. Hair has semi-transparent strands, irregular edges, and often extends well outside the geometric bounding box that AI tools use to locate the head. That boundary is where most results fall apart. It is why tool choice matters for a head swap in a way it does not for a straightforward face replacement.
What You Need Before You Start: Photo Requirements
The biggest factor in hair blending quality is not which tool you use. It is whether your two input photos are compatible. Mismatched lighting or camera angle going in guarantees a seam coming out.
- Clear, high-resolution portraits for both images. Low resolution reduces AI detection accuracy and blending quality, producing clipped hair edges and visible artifacts.
- Matching camera angle and approximate lighting between the source head and the target body. A portrait taken from slightly above will look tilted when placed onto a straight-on body photo.
- Unobstructed face. Avoid heavy occlusion, extreme profile angles, or motion blur — the AI needs to see the full head to detect the hair boundary accurately.
- Supported formats: JPG, PNG, or WebP.
- File size under 20 MB per image (required by Live3D; a sensible ceiling for all tools).
- Legal right and consent to use all images and likenesses involved — before you start, not after.
For the cleanest hairline blending, choose source and target photos where both subjects are photographed against a plain or blurred background. Complex backgrounds directly behind the source head confuse the AI's hair-edge detection and increase the chance of clipped strands at the outer edge.
Method 1: Live3D — Free, No Signup, No Watermark
Live3D is the fastest path for most users. No account required, no watermark on the downloaded result, no payment. It accepts JPG, PNG, and WebP files up to 20 MB per image, and the AI detects face, hair boundary, and neck automatically. Results arrive in seconds.
- Prepare two photos. Source image: the body and background you want to keep. Target head image: the portrait containing the head (including hair) to transfer. Both must be JPG, PNG, or WebP and under 20 MB.
- Go to live3d.io/ai-head-swap and upload the source image by clicking the body/background upload area.
- Upload the target head image into the second upload area.
- Click Generate. The AI automatically detects the face, hair boundary, and neck in both images and performs the full head replacement.
- Preview and download. If the hairline looks clean, download — no watermark is applied. A visible seam means the two photos have mismatched lighting or angle; retry with better-matched inputs.
Live3D states that uploaded images are used only to generate the head swap result and are not shared. If your result shows the wrong hairstyle on the output, check the URL — a face-only swap tool gives face-only results. The dedicated full head swap tool is live3d.io/ai-head-swap specifically.
Method 2: Facy.ai — Prompt Control for Preserving Accessories
Glasses. Makeup. Earrings. A headband. These are the accessories a basic AI head swap drops without warning. Facy.ai solves this with a text prompt field that tells the model exactly what to carry over. It is rated 4.6 out of 5 from 214 ratings.
- Go to facy.ai/photo-head-swap and sign in with Google or email. Free credits are granted on signup.
- Upload Source Head — the photo containing the head (including hair and any accessories like glasses) that you want to use.
- Upload Target Body — the photo of the body where the new head will be placed.
- Expand "Customize the swap" and type a prompt to preserve accessories: e.g., keep glasses, keep makeup, keep earrings. Skip this step if no accessories need preserving.
- Click Generate and review. If accessories are still missing after the first result, adjust the prompt and regenerate. Download when satisfied.
Facy.ai requires you to confirm before generating: "I confirm I have the legal right to upload and edit this image and permission from anyone depicted. The use of materials depicting persons under the age of 18 is prohibited." Read that before uploading any image.
Method 3: Dzine.ai — Describe the Result with a Text Command
Some users prefer to describe the final image rather than rely on automatic detection. Dzine.ai's Chat Editor accepts a text command alongside the uploaded images, giving you an extra layer of control over how the head and hair blend into the base photo.
- Go to dzine.ai/tools/head-swap and upload both images in the Chat Editor: the base photo (body to keep) and the image containing the desired head.
- Enter a text command describing the desired final image — e.g., Replace the head with the one from the second image, keeping the original background and body pose.
- Click Generate. The AI processes the swap and blends the head including hair into the base image. Results arrive in seconds.
- Review and download. No watermark on the free tier. If hair blending is not clean, regenerate with a refined prompt.
Method 4: HeadSwap.app — Web and iOS (Check Free Tier Limits First)
HeadSwap.app runs on both web and iOS and is the main mobile option. The critical caveat: iOS users start with only 100 credits and a watermark is applied on the free tier. Know this before you start, not halfway through your attempts.
- Check your credit balance first. iOS pricing: 100 credits = $1.99; 1,800 credits = $19.99; 16,000 credits = $79.99. If you need a clean watermark-free result, plan credit purchases before starting.
- Upload Head Image — a clear, front-facing portrait of the head (including hair) you want to use.
- Upload Original Image — the photo with the head you want to replace.
- Click Generate and preview. If the output is blank or shows an error, verify the file is JPG/PNG/WebP, the file size is under 20 MB, and the face is clearly visible and unobstructed.
- Download. The watermark will appear if you are on the free tier.
HeadSwap.app requires iOS 15.1 or later and the app is 33.3 MB. Its privacy policy states that facial data is never stored. If a per-image pricing model fits your workflow better than a credit bundle, WaveSpeed AI charges $0.025 per run — roughly 40 runs per $1 — with no watermarks on output. If you need a watermark-free result at no cost, Live3D remains the cleaner choice.
Why Hair Is the Hardest Part — and How to Read Your Result
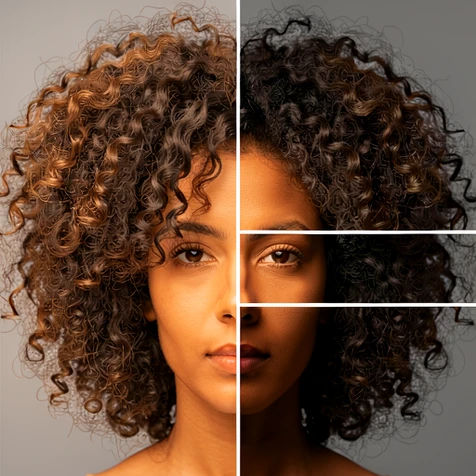
Not all hair is the same difficulty. Straight, close-cropped hair stays close to the skull. Most bounding-box detectors capture it cleanly on the first attempt.
Curly, voluminous, or windswept hair is a different problem. Those strands extend well beyond the rectangular bounding box the AI uses to locate the head. The detector captures the box, blends the edges of that box, and clips anything outside it. That is why a curly-haired swap often looks correct in the center but has a hard cut at the outer edge, as if someone traced around the head with scissors.
Tools with segmentation-based hair detection trace the actual hair contour rather than a rectangle, capturing flyaway strands correctly. PuLID on SDXL goes further: it uses diffusion-based identity transfer and handles hair regardless of whether the source and target head positions match — unlike IPAdapter, which requires matching positions and performs poorly with hair.
A visible seam at the hairline does not always mean the tool failed. Usually it means the source and target photos have different lighting or camera angle. The AI placed the head correctly, but the lighting model disagrees across the boundary, so the edge reads as a paste rather than a blend. Fix the inputs.
Quick test before sharing: zoom in to 100% on the hairline. A seam invisible at thumbnail size becomes obvious at full resolution. If you see a hard edge, retry with better-matched input photos before writing off the tool.
Failure Recovery: What to Do When the Result Looks Wrong
Each failure mode has a specific cause and a specific fix. Here are the five most common problems and what actually causes them.
| What you see | Root cause | Fix |
|---|---|---|
| Wrong hairstyle on the output | You used a face-only swap tool, not a full head swap tool | Switch to Live3D, Facy.ai, Dzine.ai, or HeadSwap.app — tools built for full head replacement, not face-only replacement |
| Visible seam at the hairline | Mismatched lighting or camera angle between source and target photos | Find better-matched input photos or re-shoot with compatible conditions; the tool is not the problem here |
| Glasses, makeup, or accessories missing | AI does not carry over accessories unless explicitly instructed | Use Facy.ai's prompt field — type "keep glasses" or "keep makeup" before generating |
| AI swapped the wrong person's head in a group photo | AI detected the closest or largest face rather than the intended one | Crop the target body image to isolate the correct person before uploading |
| Blank output or generation error | Unsupported file format, file over 20 MB, face obstructed, or extreme profile angle | Confirm JPG/PNG/WebP format, file size under 20 MB, face unobstructed and not at extreme profile |
| Head looks tilted or unnaturally angled | Camera angle mismatch between source and target input photos | Match camera angle between input photos; Neural Filters in Photoshop can fine-tune angle as a post-step for minor corrections |
Group photo scenario: a photographer fixing a shot where one person blinked. Upload the group shot as the target body and a separate clean portrait as the source head. Before uploading, crop the group photo tightly around the person you want to replace. This prevents the AI from detecting the wrong face in the frame.
Advanced Option: SD.Next with PuLID — Offline, No Uploads Required
If you cannot upload images to any cloud service, SD.Next with PuLID runs the entire process on your own machine. No image ever leaves your computer.
- Install SD.Next locally. It is open source, free, and has 7k stars and 556 forks on GitHub. Load an SDXL-compatible model.
- Install the PuLID extension in SD.Next. Do not use IPAdapter for this task — IPAdapter requires matching head positions in both images and performs poorly with hair transfer. PuLID handles full face and hair regardless of head position differences.
- Load the source head image as reference in the PuLID interface — the portrait containing the head and hair to transfer.
- Run generation. PuLID transfers the full face and hair even when source and target have different head angles. Review and save the output locally.
This is not a beginner path. It requires comfort with local AI setup, a machine capable of running SDXL, and patience during initial configuration. For most users, Live3D or Facy.ai produces a usable result far faster.
Consent, Privacy, and Legal Requirements
Every tool listed here requires that you have the legal right and consent to use all images and likenesses involved. This is not boilerplate.
- Do not impersonate real people for fraud, harassment, or deception.
- Do not upload private, sensitive, or copyrighted material without authorization.
- CSAM content is explicitly prohibited across all tools listed here.
- Live3D states that uploaded images are used only to generate the result and are not shared.
- HeadSwap.app and Pokecut both state that facial data is never stored.
- WaveSpeed AI requires users to confirm they have the legal right and consent to use all images and likenesses involved in their edits.
Facy.ai makes the obligation explicit before every generation: "I confirm I have the legal right to upload and edit this image and permission from anyone depicted." Read that confirmation before uploading any image, and take it seriously before publishing results publicly.